When it came time to purchase a set of sun visor clips for Project 510, there were no options other than to purchase them used. I was able to source a set of Bluebird clips in decent condition from Japan, but the drawback was that they were white as with all visor clips offered for the 510. Having redone the car’s headliner and entire interior in black only magnified the issue at hand. Do I install the white clips and have them stand out like a sore thumb or paint them to match the rest of the interior? I chose the latter of the two and decided a quick fix was to spray them with plastic paint.
Experiment Part One

The visor parts were carefully prepped with cleaner and plastic adhesive, prior to coating them with an aftermarket pigment formulated to restore or change color on most vinyl surfaces, flexible and rigid plastics; it’s considered a permanent coating. The only conceivable problem is this type of paint is not a dye, which could become an issue if the sun visors were continually used, which could eventually cause the painted surface to scratch or chip.
24 hours after the paint had fully cured, I decided to test the piece by swiping my finger nail across the surface. To my dismay, the paint scraped off with minimal effort. So what was I to do? I needed to find an alternative solution that would result in a permanent color change. After some research, I found a compelling answer in the form of plastic dyeing.
RIT Plastic Dyeing

Utterly disappointed from the previous spray paint debacle, I decided to move on to the next experimental procedure using a combination of household products in an attempt to dye these plastic parts. Rit dye is a product formulated for dyeing fabric. However, Rit also dyes plastic materials very well and it’s very popular within the hobby community – their black dye in particular works very well, and it’s almost impossible to tell if something is dyed or not. A huge advantage of dyeing is that this method completely penetrates the plastic, so if you scratch the piece it won’t show the old color but will show the dyed color unlike spray paint. Rit can usually be found at your local department store; it is available in different pigments should you desire an alternative color.
Any light-colored plastic part will usually accept dye (the rule is you can go darker, not lighter), but you need to be aware that mixing colors won’t always yield great results. You also want to make sure that you clean your parts very well before their dye bath. Any dirt, grime or oil can cause discoloration.
The dyeing process typically takes approximately 15-30 minutes, but depending upon the type of plastic, it could take up to an hour. If the pieces are not as dark as desired, go ahead and throw them back into the dye for a few more minutes. If something doesn’t dye even after an hour, most likely it won’t take the dye well. Take, for example, a plastic building block piece I soaked for a few days in a mixture of Rit dye and Acetone. The plastic did change ever so slightly in hue, but is clearly not black in color as I intended.
Experiment Part Two
Once the part was prepped and ready for stage two of the bathing experiment, I was ready to start the dye process by mixing salt, water, vinegar and dish detergent into a boiling pot of water.
Step one begins with a pot of water brought to boil and checked using the thermal gun. Ideally, the water should be anywhere from 170 to 200 degrees Fahrenheit. Smaller parts require less temperature as the heat allows the porous plastic to accept the dye. Make sure to use a pot that you (or your significant other!) won’t mind if it gets stained. Rinsing and scrubbing a pot after use can usually get rid of the dye, but not always.
Once the water begins rolling to a consistent boil, I poured some salt into the pot. If you paid close attention to your teacher in high school chemistry class, you may have learned that in order to raise the boiling point of 21 Quarts of water by just 34-degrees Fahrenheit, you’d have to add about 5 pounds of salt. In theory, raising the water’s boiling point will increase the chemical reaction of the dye, which in turn accelerates the adhesion process to the plastic components.

Once the salt was fully dissolved, I poured approximately one cup of white vinegar into the witch’s brew. Vinegar is also known as acetic acid, which helps the dye to penetrate the surface of the plastic more effectively.

Give the formula a couple stirs before adding in dishwashing detergent. I poured in a teaspoon of Cascade found in the kitchen cabinet. The detergent helps to depolarize the water and allows the dye to mix better with the water.
Finally, I mixed the Rit liquid dye into the pot and stirred using a disposable wooden chopstick. The dye will stain anything and everything it touches – including your clothes – so be forewarned!

Once the dye is completely mixed, I submerged the plastic into the water at a steady boil for one hour and checked progress every 15 minutes. It is important to remember to keep your pot of water at a rolling boil! If you splash the dye on the stove or kitchen element, clean it ASAP. Dye will leave marks on pretty much anything, so be aware of that risk!

The next hour was spent gently agitating the parts while making sure to refill my water levels due to evaporation. After the first 15 minutes, I pulled the parts out to check the progress and found minimal change. I dropped the parts back into the pot, then reset the timer for 15 more minutes. Once the timer went off, I checked the part, only to find it covered in a blotchy coating of dye but no change in color. After one hour of boiling the part, I pulled the piece out and dunked it into a cup of distilled water to close up the pores and seal the surface.

What was the final verdict? The parts seemed to take to the chemical solution and dye mixture I concocted, but the part was apparently visible in a hue of black and purple. Instead of the plastic parts turning a jet black, as I had seen other people have results with, my parts turned a dark purple, which was not the goal at all. As it turns out, the ingredients used in the Rit Dye didn’t adhere to the type of plastic that the visors were made from.
Keep in mind that not all plastics can be dyed. High density polyurethane does not let the dye adhere very well, and the process for dying this type of plastic is very sensitive to error, and takes quite a while. Patience is the key! With that said, I wrapped up the kitchen experiment and decided to change our strategy by heading out to the local fabric store to purchase some synthetic fiber dye.
Experiment Part 3

Rit Dye More is blended with synthetic pigments and contains a type of dye called disperse dye. This newly released formula can dye polyester, acrylic, acetate, nylon and polyester/cotton blend fabrics, as well as other synthetic materials.
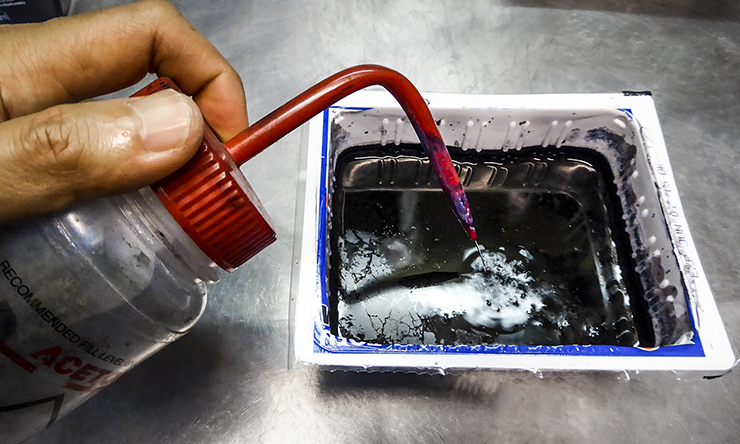
So I took a more aggressive approach this time around and mixed acetone with the newly-purchased Rit formula. I began stage 3 by filling a small container with water heated to 200 degrees Fahrenheit.

Because I used acetone as an activator for this experiment, I moved the procedure into a well-ventilated area. Pure acetone is best bought at any hardware store – larger quantities can be purchased inexpensively, and it will last much longer than a small bottle of nail polish remover bought at a retail store.
Pro tip: never add acetone to a hot water dye. Acetone has a lower boiling point than water and will explode on contact, similar to throwing water into a pot of boiling oil. We learned this the hard way and nearly peed in our pants when the liquids literally jumped out of the container.

I proceeded to mix two cups of water to a quarter cup of “Dye More” and five percent acetone solution before dropping the parts in. There is no concrete setting for how much acetone it takes to dye any plastic – this part of the process is trial and error. You need to add acetone until the part accepts the dye, but at the same time be sure that the plastic does not have a serious reaction to the acetone, which can cause it to melt.

Acetone allows the dye to seep into the pores of the material. If the plastic isn’t taking the dye at all then more acetone must be used.
Finally, success!
After agitating the parts in the new Dye More solution and acetone mixture for 15 minutes, the parts came out noticeably blacker in color. The parts spent a few more minutes in the chemical bath before they were removed and washed in distilled water.
Here are the newly dyed sun visor parts fresh out of the mixture. Other than the scuff marks left from the sand paper, both visor clips look like they were molded in black straight from the factory – and the best part was not a hint of white upon final inspection!


