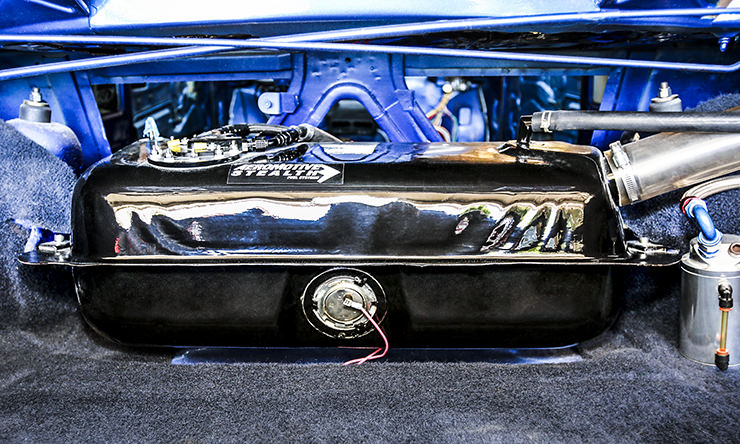
So, what’s the horsepower-loving street driver to do when more horsepower is sought after, and the old stock mechanical fuel pump just won’t cut it anymore? Or when the decision is made to convert the fuel delivery system into an electronic fuel injection from an old-school carburetor? Turn that mediocre delivery system into to a high performance fuel system, of course! Until recently, there have been three options when it comes to converting a carbureted fuel tank to an EFI setup: weld in a sump to your tank, go with a fuel cell, or pay for a custom tank. The 1970 Datsun 510 we’ve been restoring and upgrading over the last several months is in serious need of an upgrade, as we have big plans for its performance appetite in the near future.

Aeromotive now gives you a fourth option: the option to retrofit non-EFI fuel tanks with one of the company’s high-performance fuel pumps. They’ve done all of the guesswork for you, in the form of their Phantom Fuel System, which is engineered specifically to add a fuel pump inside fuel tanks that were manufactured without an internal pump. This universal in-tank fuel pump kit includes everything needed to set up and install an in-tank pump. The Phantom kit includes the fuel pump, billet aluminum top, attachment ring, bladder and yellow baffle foam, aluminum drill guide, and mounting bracket for the fuel pump.
The process is relatively simple in theory, as Aeromotive provides the information required to outfit the tank to install the new pump assembly. Within just a few hours, you can have a high-performance fuel pump inside your factory tank capable of supporting your vehicle’s fuel demands.

Why is in-tank better?
A surge tank or external fuel pump setup is a common solution used by performance enthusiasts over the years, but there are a few facts to consider before installing these types of systems. A major disadvantage of pulling fuel from the tank to a surge tank or all the way to the front of the car is that volatile gasoline exposed to the pump’s vacuum and heat can tend to vaporize in the fuel line. Vapor lock – an issue many high performance cars experience – occurs when the liquid fuel changes state from liquid to gas while still in the fuel delivery system. This is possible when conditions of high heat and low pressure are present. When vapor lock takes place, the fuel pump is not able to move the vaporized fuel and the engine will stall, or worse, cause lean air/fuel mixture conditions which can lead to detonation and a damaged engine.
Conversely, mounting the pump in the tank has a number of definite advantages. Most importantly, the in-tank pump is cooled by the fuel in the tank, which helps to prolong the life of the pump. The second advantage is in direct relation to how close the fuel is located to the pump, when compared to an external pump solution, which requires pushing the fuel for delivery. Thirdly, a pump that’s inside the gas tank tends to be quieter than a pump mounted in the open in front of the gas tank – and often directly to the chassis, which can be annoying to the vehicle owner. Finally, locating the pump inside the tank eliminates the chance of road debris coming in direct contact with the unit. Imagine a sharp object puncturing the fuel pump as it then begins to spray fuel under and onto your hot exhaust system. Not the best scenario!
340 Stealth Fuel Pump
The Phantom kit includes one of Aeromotive’s high-pressure 340 Stealth fuel pumps. The Aeromotive 340 is a high-output, in-tank, electric fuel pump that fits most popular EFI applications. The pump uses a turbine-style design, which can be pulse-width modulated, should you desire to control the pump electronically, and offers exceptional flow throughout a wide pressure range.

Testing shows the pump delivers more than 340 liters per hour at 40 psi, which supports up to 700 horsepower in an EFI/forced induction configuration. This same pump is capable of supplying up to 850 horsepower for a naturally-aspirated combination where the fuel requirements are not as demanding under high pressure. This pump is ideal for applications requiring more flow while retaining the factory wiring and mounting provisions available in the Original Equipment configuration.
Tuning Up the Tank
If we had to best describe our Datsun 510’s fuel system, it would be none other than “Old School.”
Direct from the factory, the Datsun tank is comprised of untreated steel and designed without any internal rust inhibitors or corrosion resistant lining. Internally, the tank showed minimal rust, but regardless, the corrosion existed.
To address the issue, we bathed the tank with POR-15 metal prep solution. The POR-15 was left soaking inside the tank overnight to work its magic and flushed out the following day. Another option for those eco-friendly individuals is to use apple cider vinegar. When mixed in a 50/50 vinegar concentration with water, the acid in the vinegar will break down the rust. Just be sure to neutralize it with baking soda afterward, as the chemical composition will continue to eat away at the metal if not properly addressed. The original feed lines were also welded shut as they won’t be used with our new fuel delivery system.
Fitment
Before we began cutting to fit the Stealth unit, a digital bore scope was used to look inside the fuel tank to determine the perfect position for the Phantom kit in the deepest part of the tank. Our Datsun 510 fuel tank uses an internal baffling system that is channeled into six different compartments by way of metal dividers. After poking and prodding around inside our tank, we found an area that wouldn’t interfere with our new setup, and gave plenty of clearance to accommodate the yellow foam baffle included in the kit. We began the operating procedure by using a 3.25-inch hole-saw we purchased from our local hardware store, bolted it to our drill, and began cutting.
Aeromotive provides an aluminum drill guide as a template to drill each of the attaching holes for the hat assembly. Be sure to use the supplied screws to hold the guide in place once you drill two provisionary holes to help position the drill guide. We initially didn’t read the instructions provided with the kit, and held the guide by hand. Needlessly to say, the holes were slightly offset which caused issues when it came time to install the mounting bracket. Lesson of the day – don’t be like us, and read the directions thoroughly before making any holes!

Each of the cut areas were subsequently deburred before the tank was given a thorough cleaning to ensure no metal shavings could enter the fuel system. If you’re using soap and water to flush out the unit, be sure to use an air compressor to quickly dry inside of the tank to prevent any rust. We completely stripped the 40-year-old paint and recoated it using an enamel-based epoxy for durability as well as for improved appearance.
While the fresh coats of paint were drying, we began tackling the job of assembling and clearancing the pump, foam and mounting bracket. It was required to check the depth of the pump assembly to optimize the hanger assembly’s distance from the bottom of the tank. The Phantom System is a universal kit which requires you to customize the foam baffle and hanger assembly to your specific fuel tank application. The Stealth kit will fit virtually any tank from 5.50-inches deep to 11.00 inches deep, whether it’s plastic, steel, aluminum, corrugated or smooth. With an adjustable bracket, the pump can be hung at optimal height for any gas tank. When modifying the hanger, leave enough room for the fuel sock/strainer to clear the bottom of the tank, but don’t cut it too short, which can lead to fuel starvation issues. This is where the measure twice, cut once mantra comes into play again.
In comparison to rubber hoses supplied with OE-style fuel pumps, which can degrade over time, the Phantom Stealth kit comes supplied with a composite plastic fuel line that is fully compatible with all types of fuels. We trimmed the piece prior to clamping the fuel pump onto the hanger.
Here’s a quick mockup photo of the fuel foam positioned inside the bladder. The internal baffle is designed to control fuel slosh and keep the fuel pump submerged. This foam piece and rubber bladder creates a sump in your existing fuel tank, providing a constant fuel supply around your pump, even under heavy cornering. Without it, your vehicle is susceptible to sucking air under hard acceleration, cornering and braking which can cause fuel starvation. Aeromotive recommends you leave an additional inch of foam to allow the piece to fit snug and prevent from moving around inside the tank.

Using the previous measurements, cut the foam using a razor or scissors. We preferred the scissor method as it helped to keep our cuts uniform and prevent any unwanted remnants from falling inside the foam, which can then get sucked up to the strainer and potentially damage the pump.
Using the aluminum drill guide, carefully insert the foam and baffle. Pay special attention when inserting the billet retainer ring to ensure the foam has spread out evenly.

Insert the rubber gasket before lowering the billet top hat and fuel pump assembly into place. The gasket allows a leak-free installation as well as preventing any obnoxious fuel fumes from entering the vehicle’s cabin.

Teflon washers are also supplied in the kit and must be used to ensure a leak-free setup. Finish the installation by tightening the nylon nuts and you’re ready to install your fuel lines and wire up your newly installed Aeromotive Phantom Stealth Fuel System. Adding more fueling capacity to your old school hotrod – regardless of fuel system configuration – has never been simpler.


