- Toyota Tacomas have long been equipped with factory drum brakes in the rear.
- There are countless advantages to disc brakes over drums, including both performance and cosmetic.
- Pedders’ TrakRyder rear disc brake conversion kit gives the OE brake feel with aftermarket stopping power.
There are a few different choices for hopeful buyers in the compact pickup truck segment. There are offerings like the new Ford Ranger and the Colorado from Chevrolet, but the most popular, by far, is the Toyota Tacoma. All three are offered in varying cab and bed combinations. All three can tow at least 6,800 pounds, and all three come equipped with four-wheel disc br — wait, no, they don’t. The Tacoma still has rear drum brakes. Yep, after multiple iterations, even the newest TRD Pro models don’t even have rear disc brakes, and Toyota isn’t keen on changing it any time soon. If you’re a prospective Tacoma buyer and the rear drums are holding you back from making a purchase, or if you’re a current Tacoma owner looking to upgrade, we’ve got some news for you. Pedders Suspension & Brakes — the Australian aftermarket automotive specialists — produces its TrakRyder Rear Disc Brake Conversion Kit (PED-PBCK006) specifically for the 2005-2021 Toyota Tacoma! We caught up with our friends over at R/T Tuning in Montgomeryville, PA, during a recent installation so we can showcase what this conversion to rear disc brakes is all about.


WHY DOES THE TACOMA STILL HAVE DRUM BRAKES?
There are multiple answers to that question, but cost is the most prominent — cost to Toyota for development on millions of trucks and cost to the consumer on maintenance items down the road. Toyota already paid to develop the Tacoma’s rear drum technology and parts ages ago, so the company saves costs by recycling instead of creating an entirely new braking system (and potentially passes those savings onto consumers by offering the Tacoma at a lower price point). Another reason Toyota has claimed its popular truck still rocks dated technology — while its competitors have updated — is better brake protection in harsh conditions. This one has some room for argument, though.


WHAT ARE THE DOWNSIDES OF DRUM BRAKES?
For one, they’re an enclosed system with all of the braking components housed inside the drum, which promotes friction and heat, leading to a detrimental issue adversely affecting braking performance called brake fade. In addition, the enclosed braking area can’t discharge any foreign contaminants that trespass inside, not to mention the buildup of used friction material (brake dust) from the shoes over time and its negative effect on the various springs, seals, and hydraulic system’s wheel cylinder. Lastly, the drum is not a sealed environment, so any introduction of mud or water can affect the braking ability of the components inside.
WHY CONVERT TO DISC BRAKES?
It’s almost a no-brainer to me. There’s virtually no reason not to upgrade to disc brakes other than cost, which is never much of a deterrent in our industry. It’s a newer technology built around an open-air concept meaning heat is efficiently dissipated, and centrifugal forces act alongside the open design to remove water and contaminants to keep braking potential constant. Cosmetically, disc brakes also present different options for drilled or slotted rotors, along with colorful caliper choices, should you want your braking system to look nicer.


WHO IS PEDDERS?
Since 1950, the team at Pedders has played a prominent role in the Australian automotive aftermarket industry. Providing solutions for enthusiast drivers is the company’s primary goal, and while its parts perform exceptionally well on the race track, each is still suitable for the street. Pedders tries to create the perfect balance between civility and performance by approaching projects with the precision of OE engineers without the constraints of big corporate finance departments. When it came time for the company to focus on the Toyota Tacoma, they knew two pieces to improve right away. The first is the rear disc brake conversion kit we’re discussing today. The second is the truck’s suspension system, which we’ll get into another day.
KIT FEATURES AND BENEFITS
Let’s start with ease of maintenance. Not to sound like one of those late-night infomercials, but for anyone who has fumbled around with the delicate process of replacing the shoes, springs, and wheel cylinders of a drum brake setup, then I’m sure you’re game for a more straightforward solution. Well, disc brakes can deliver that. Once installed, the maintenance process is quite simple, with only the removal of two bolts needed for a brake pad change and no removal of anything required to inspect the system. Then there’s the fact that this kit retains the use of the factory parking brake cable, which allows easy adjustment, and maintains an OE feel.
Next, we can get into the abundance of general reasons I listed above for converting to disc brakes, including heat dissipation, water dispersion, increased stopping power, and improved brake pedal feel and modulation. The exposure to open-air elongates the time it takes to incur brake fade, and the disc brakes are entirely self-adjusting as additional bonuses.
Lastly, this kit includes damn near everything needed for the complete conversion from drum to disc brake in the rear (though, some items will still need to be purchased). Pieces like Pedders TrakRyder Geomet-coated disc brake rotors, along with a set of rear TrakRyder Kevlar Ceramic brake pads, are included. It’s ADR (Australian Design Rule) Certified and comes with a 2-year/24,000-mile warranty for peace of mind, too.


THE INSTALLATION
If we measured our difficulty scale in dog size, this one’s probably a medium dog install. If you’re not somewhat technically savvy or mechanically inclined, this one might be best left to the pros (as we did, by taking it to R/T Tuning). Some points require a press and advanced knowledge, so beware. Pedders hosts an installation video showcasing the process, but we’re going to walk you through our experience.
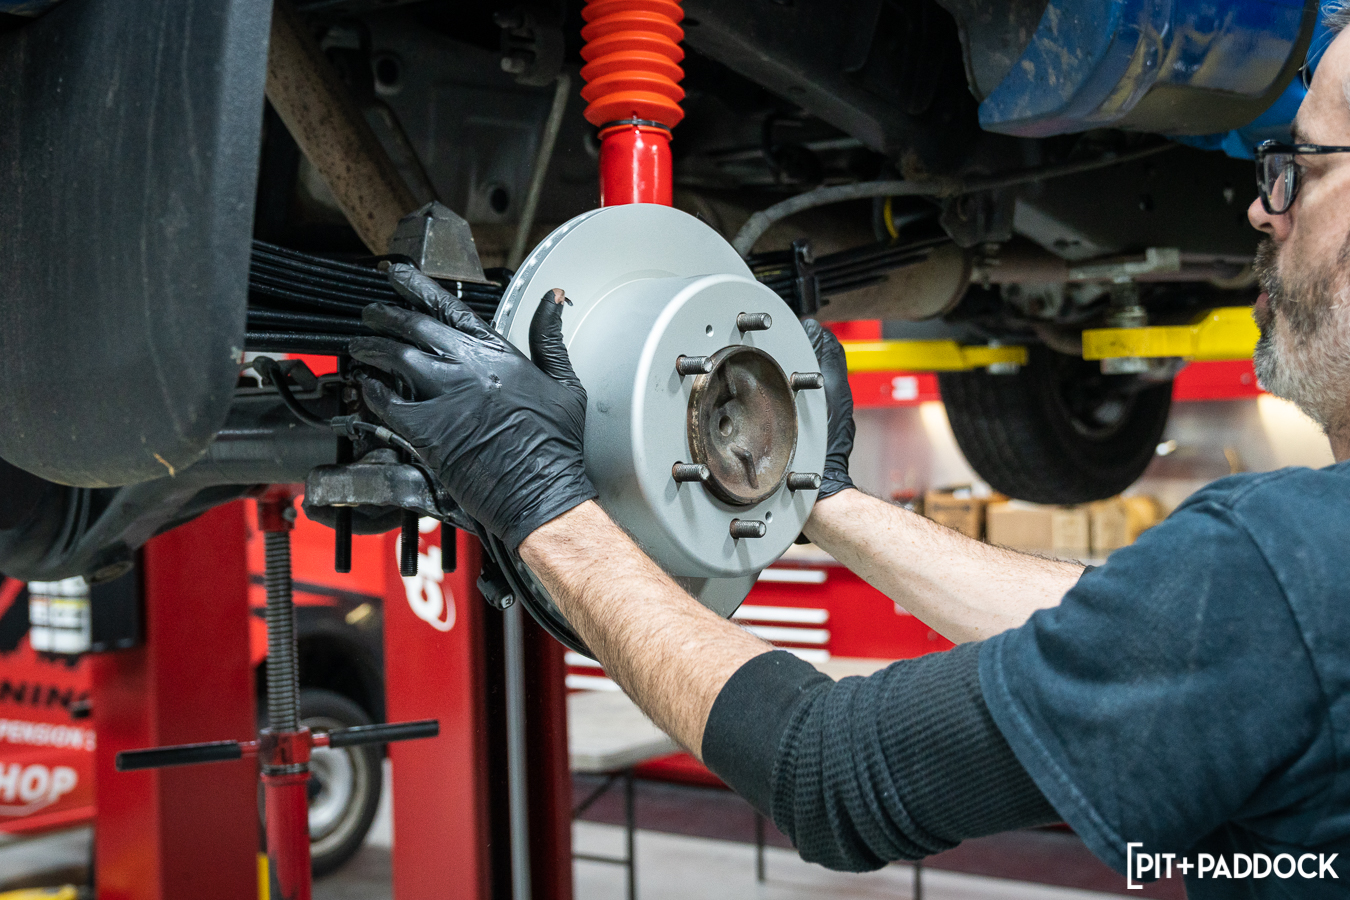
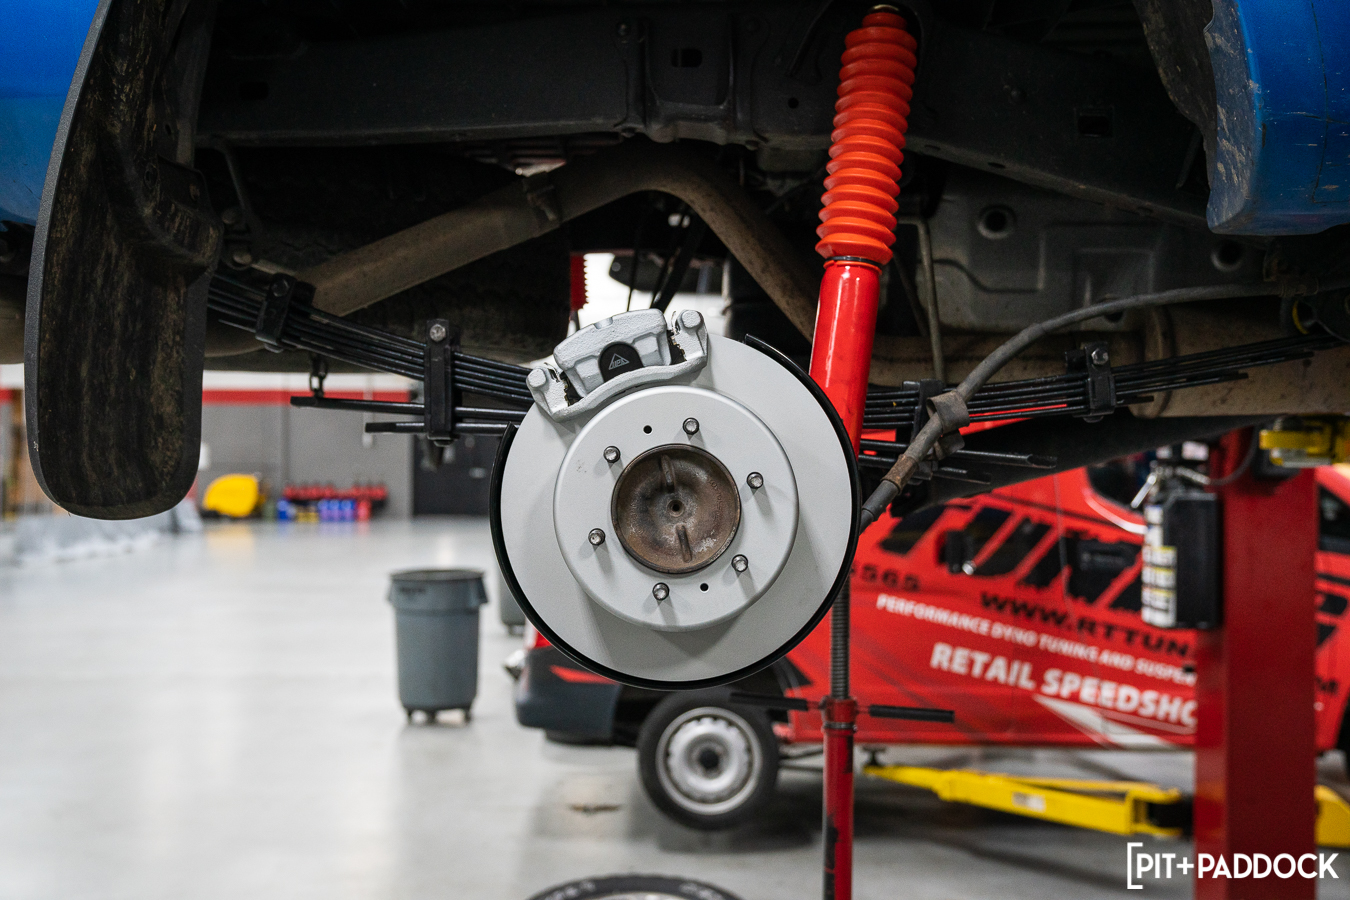
First, Pat from R/T Tuning raised the truck into the air and removed the wheels. He pulled the rear differential’s fill and drain plug to release the fluid inside. Next, he removed the drum to access the components inside, which he also removed — along with the parking brake cable, hydraulic brake lines, and the wheel cylinder itself.
An important step is to carefully remove the ABS sensor so as not to damage it in the process. These tiny sending units are expensive, and there’s no sense shelling out for a replacement if you don’t need to. In our case, there was such a large amount of rust buildup that we needed to replace them anyway.


From there, he removed the axle flange bolts and carefully pulled the axle completely out. Once out, a visible circlip is next on the removal list before heading to the press. The bearing, housing, and backing plate are pressed out from their home on the OE unit and removed. You’ll need to reuse the OE wheel studs, retainer, and spacer, so don’t lose them or forget how they’re attached. Here is where you’d be back at the press, pressing the bearing from its housing to replace it with a new bearing. However, if you recall, we mentioned this kit includes damn near everything needed for installation — well, it doesn’t include wheel bearings. Pedders (and Pit+Paddock, and R/T Tuning) recommend replacing the wheel bearings during this conversion process. So, we opted for the less-risky (albeit more expensive) alternative of purchasing an OE bearing already in its housing rather than ordering just the replacement bearing itself. This option prevents any mishaps with pressing a new bearing in, reusing the old housing, or worse, reusing the old bearing.
The rest of the process is simply the assembly portion of the installation. We started attaching the prepared bearing and housing to the new Pedders backing plate. Pat pressed the wheel studs in, then realigned the axle seal and backing plate onto the axle with the new spacer and retaining collar. He pressed the axle assembly into the hub and reinserted the axle into the truck (making sure not to disrupt the seal).


Then, it’s a bolt-on affair attaching all of the included brackets, hardware, emergency brake shoe assemblies and cable, rotors, calipers, and brake pads. With everything tightened to spec, adjusting the e-brake shoes’ tension, refilling the gear oil in the differential housing, and bleeding the entire brake system is the final step. During the road test, Pat bedded in the pads and checked the tension of the parking brake to finish it all off.
THE STATS
With this kit installed, Pedders has published official statistics of the Tacoma and Hilux trucks slowing down from 64.6mph to 0. The OE drum system stopped the truck in 327.1 feet, while the Pedders TrakRyder rear disc brake conversion-equipped truck took only 199.2 feet to slow from the same speed. That’s an upgraded average deceleration increase from 13.88 feet per second to 21.52 feet per second. The stopping power improvement speaks for itself, but the appearance of the disc brakes is an aesthetic perk, too. Stay tuned for the finale of this install as we tackle the Pedders SportsRyder suspension system on this same truck.
Gallery


OFFICIAL PARTNERS


OFFICIAL PARTNERS